Monday, March 31, 2014

Green Goddess Creations, Owl Decals


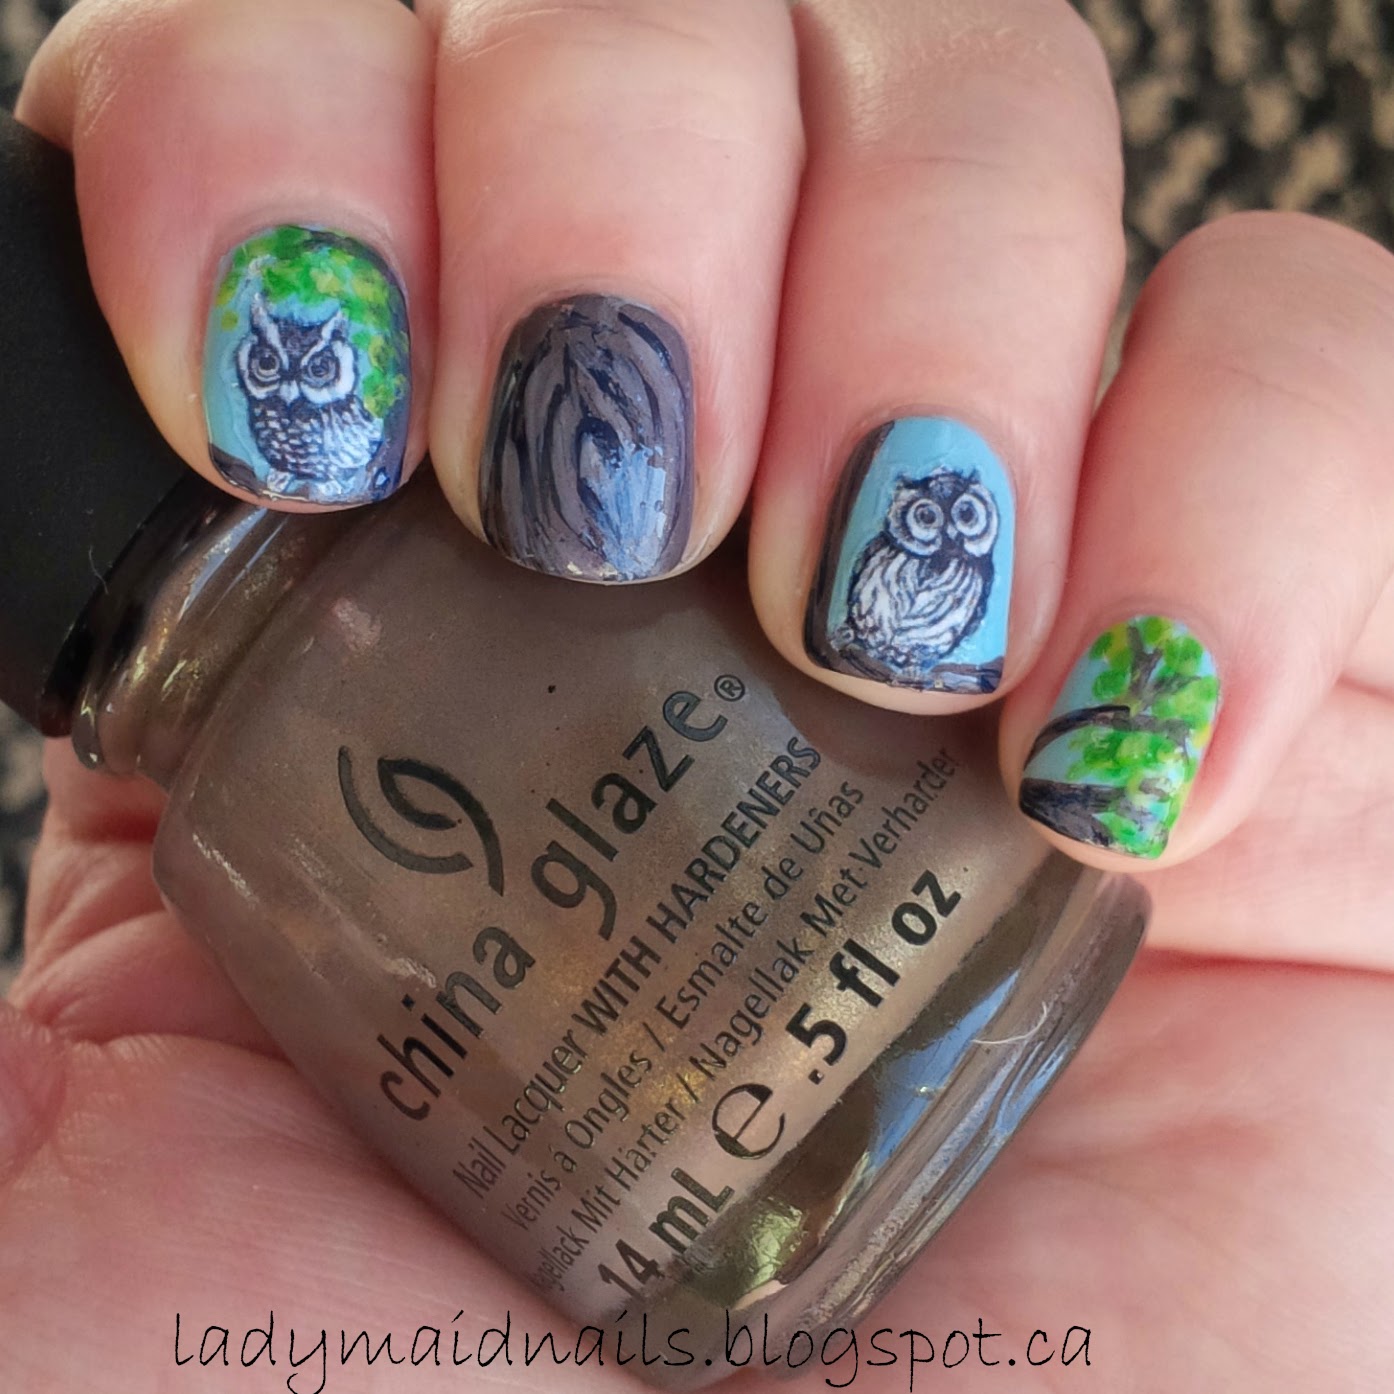
As promised, here is my second review for decals received from the Green Goddess Creations Store on Store Envy. These owl images were actually the first I saw on Instagram and followed them to the lovely Lelia's page. As I mentioned before, these decals come forty a page. You get enough for tons of manicures. When I compare to some other brands. This page has four different owls in different Owly positions. My favorite were the two chosen here, because they are so....well...goofy! If you want to check to the listing for these owls, it's linked here.

In the instructions it mentions you can take a acrylic paint and fill in the clear areas of the decal depending on the base colour your using. I wanted to try this out, so I could let you know how easy this was to accomplish. Piece of cake! I cut and trimmed the decals as before, then soaked and removed them. I flipped them upside down and splodged on the white paint with my detail brush. As you can see it's not a fussy project at all..


Next I added a quick drying topcoat and gently placed and smoothed the decals on and allowed the topper to dry. My base colour here is two coats of Ciate Peperminty.


Once that was done I went in with my details. I used Essie Shake Your $$ Maker and Nicole By OPI Daffy Dill for the leaves. China Glaze Ingrid for the wood and then added a bit of black acrylic with my brush to give a bark effect. As you can see I changed my mind and switched that middle finger to a trunk mid stream.


These last two were taken in indirect sunlight. 
Don't forget to check out all the other great decals at Lelia's store linked here. All in all I am well impressed with the quality and selection of the Green Goddess Creations store. Lelia also works on custom orders for those of you who need something specific, or for a special occasion.

Cheers all,

Saturday, March 29, 2014

Jindie, Snow Globe. Last Ode to Winter!

So this is a post I finished a while back but it sat in my blogger for a while. I wanted to share it with you guys now as my last ode to this crazy  North American winter we all suffered through this year! This is the first week we went into the single digits above zero...and it's lovely! 

Anyway, this is two coats of Jindie Snow Globe which is a really deep and amazing polish that I just love. It would be equally well placed in spring too because of its soft colour palette. 

The accent finger base coulor is Revlon Blue Lagoon and the details are acrylic paint. 


I've been working on macro shot a little bit too.


Just a simple and cute one. 

Cheers all,

Friday, March 28, 2014

Copycat Look of the week, Lotus Flowers by @Bwlblogger

So, I've been wanting to start a new series. I don't know about you guys, but my nail obsession actually began with me saving hundreds of photos in an inspiration folder for me to try out later...and I never do! This isn't a bad thing, it means my stuff is in someway unique or what not. I've really been wanting to dive in and show you my rendition of the looks that get me stoked on IG and from the blogs I follow.

My first look is from an artist we all know and love, my own partner for Freehand Fridays, Ashley! Ashley constantly amazes me with her skills. She posted this look yesterday over on Instagram, you can follow her account Here. Once I saw it, I ran upstairs right away to recreate it. For my look I used A England Briar Rose Sleeping Beauty for my base. The gold tone is a stunning Franken I've been working on for spring and the black and yellow are acrylic paint.


Thanks for stopping by, and don't forget to head over to Ashley's IG page to check out her stuff.

Cheers all,

Thursday, March 27, 2014

Green Goddess Creations, Panda Nail Decal


These amazingly adorable Panda Water Slide Decals were sent to me by the lovely Lelia over at Green Goddess Creations on Store Envy linked here. You can also see a peek of the owls I get to show you next. Her packaging was cute and her instructions very easy to follow, and you also get 40 images per sheet, so it's a great value and will last forever.

The colours I used for this mani were Sally Hansen White On, Sally Girl un-named pastel green, Essie Shake Your $$ Maker and Revlon After Party.


Below I have a shot of the decals all trimmed and ready to go. The direct link for them is linked here.


Using money maker and after party I created the bamboo accent fingers. These were very simple to achieve for anyone interested.


And voila, the stars of the show make their appearance. These went the full width of my small nail bed, so they would fit any size nails. Once I had them on I added a little more of the bamboo around the top and gave them each a bamboo snack at the bottom.


Below is a way to close-up shot so you can check out the cuteness.


I can't stand how cute these came out, I might need to retire now from the nail game...nah...I still have the owls to play with!! Stay tuned for those.

For the cute owls or these Panda guys and soo many others please don't forget to visit Lelia's Store Envy linked here.  With spring coming up decals sure make nail art quicker so you can get outside!

Cheers all,


Tuesday, March 25, 2014

CMYK Colour Block Nail Decal, Born Pretty Store Review


So this is my third review now for the decals I was sent for review by Born Pretty Store. This image I chose because I love the bubble image that comes in four colours enough for each hand and a CMYK image found here. Now that image is funny for anyone who ever worked in graphic design or television production like I did. Long live CMYK! Make sure you check it out.

Anyway I wanted to use all the colour block ones on this but wrecked the blue due to user error when I shifted it too much and wrinkled it. I chose this Pipe Dream Polish in Tomorrow's a Mystery as an accent because its the same colour as the blue one. ‎I would have used the other blue from the sample, but I have plans for another mani using the rest! As with the last review this comes as one sheet, so you will need to cut to fit each finger carefully. 
 

If my nails were longer right now you would see that the bubbles fade from darker to lighter. These would be fab on some talons, but I still enjoyed them on my current shorties.


These and tons of other options can be found at the Born Pretty Store and their prices are fantastic for these, especially using the 10% off discount code UNGX31 they are offering my readers!
 
Cheers all,


Monday, March 24, 2014

Born Pretty Water Slide Map Decal Review, Vintage Map Nail Art


This is look number two that I created using the Born Pretty Store Water Slide decals I was sent. This one is from a large selection of map images they carry. It's funny, because I didn't actually remember which map I chose till I opened the package. I got very emotional once I did, but more on that at the end of this post.

If you are interested in this particular image for yourself follow this direct link to the  Map Water Decals.


These decals are a little different then the feathers which you cut out individually. As seen in the photo above, these are one sheet. I was concerned at first how to cut them to fit. I cut a strip off the top of the section I wanted slightly wider than the three nails and slightly longer than my nail bed. I then trimmed cut it in three. The center one I rounded the top to align to my cuticle. My nails are small, so I decided to take the D in denver as part of my first finger so I wouldn't lose any letters during trimming. Once I had the sizing on the middle finger the rest was simple. I cut the edges of the map on the other two in a rough fashion and then adhered all three. HINT: once I got that one full finger settled, I kept the paper backing for sizing future manis when I go to cut them out!

As mentioned in my previous review, you can slide these around on the nail for a moment which helps to get them in the right place.


Once in place, I sponged on the darker brown polish and used a detail brush to add the charred edges in the brown and a touch of black. I really was going for the antique map look with these. I then added the little heart with a detail brush in red. Followed by topper for all fingers. The base colour for the mani is Finger Paints, Don't Make a Scene, the brown is China Glaze Ingrid. For the pinky I did the same all over, and like the tan marble look of it.


I'm hoping this last shot shows how easily I lined up the letters from the two nails. I was worried this wouldn't be an easy process, but it was simply a matter of cutting carefully and sliding it gently into place.

Cheers all, and make sure to check out Born Pretty Store and their huge selection of water decals. If you do, use this 10% off discount code UNGX31 they are offering my readers!

Now on a personal note...why the heart near Denver, and why the emotion on unpacking these? Well, my bestie and her family who we consider...well...family just announced they are moving to Denver from Canada! I literally unwrapped these two days after we found out. So Stef these are dedicated to you, and I'm going to miss you more than words...every day!

Cheers all,


Friday, March 21, 2014

Born Pretty Feather Decals, with Ruby White Tips Constance


So this was the first of three looks I have for you for Born Pretty Water Decals I was sent for review.
These feathers called my name right away when I went through all the images on their site. They have simply tons of options and the prices are great. The feathers are available here.


For this look I created a gradient using Constance from the American Horror Story Collection from Ruby White Tips. I than sponged on my Sally Hansen White On on different angles to add interest. Once dry and top coated, I cut out the feathers I wanted and moistened and placed them one at a time. When you do this be gentle as they still slide momentarily. This is helpful though, as you can slide them gently to exactly where you want them.

Once they were set, I allowed them to dry a moment before gently applying topcoat again to seal the whole thing. 


I hope you like this as much as I did. I got many compliments. I have two more looks to come for you shortly using the other two images, one with a special dedication to a very special friend. 

Cheers all, and make sure to check out Born Pretty Store and their huge selection of water decals. If you do, use this 10% off discount code UNGX31 they are offering my readers!

Cheers all,


Thursday, March 20, 2014

Pretty and Polished, Beach Bunny with Chevrons


I needed some summer...like...badly! I went out and bought a neon pink sweatshirt and put together this mani, and felt much better! This polish from Pretty and Polished was super fun on, a mix of matte pastel pink, silver and white small sized glitters in this neon pink with orange toned jelly! Pink you say...yes pink! My camera decided to lie to you...I apologize, and will be having a stern chat with it about colour accuracy when it comes to neon. When I checked online even the big girls struggled with this one. This was three thin coats, and look at the depth the glitters give in that jelly! You will need topper for sure as it's a hint textured when it dries down.

Sweet and yum!

For the chevron nail I used Konad Special White and painters tape cut with craft scissors. That is it!


 I hope this cheered up anyone feeling the winter blahs today.

Cheers all,


Tuesday, March 18, 2014

Odd Couple Gradient, With Different Dimensions Good Evening Clarice and Ruby White TIps Kim


Here we go! I've been wanting to do a subtle gradient for a while, but I didn't set out to do so with this. I put on Good Evening Clarice with full intention of wearing it as is and pictures for a swatch, (those are below). I even wore this for a day before it calledo out to me for a gradient with my favorite polish all time...Ruby White Tips Kim.

I grabbed a sponge and THE REST IS HISTORY. I think these go so well together because they have the same fine muted colouring and subtle depth of shimmer.


As the pictures below show too, Good Evening Clarice is a stunner soft minty jelly/shimmer and it glows as well. I didn't manage to capture good glow pics...have to work on this for you in future.


I don't know why I thought these might work well together, but I'm glad I did.


Do you ever feel two polishes are just made for each other? Let me know in the comments below.
Thanks for the visit today. Hope everyone had a great and safe weekend!

Cheers all,


Monday, March 17, 2014

St. Patrick's Day Manicure, from the Vault!


I completely spaced and thought St. Patricks day was mid week this year, so I thought I had time! Ehhhh, wrong! I planned a cute manicure and was going to post last year's pre-blog St. Patricks Day manicure as well. Since I have nothing done for today, figured I might as well still give you last year's. I think I need to put all the smaller holidays in my blogger calendar, because apparently if I'm not going out I forget it's coming. 


Here is my pot of gold manicure I created. This was all polish, though I couldn't tell you what I used now. I'm still pretty proud of that pot of gold. 

Have a great day, enjoy your corned beef, green beers and potatoes!  

Cheers all,