Wednesday, February 26, 2014

Takko Nirvana with Gold Nail Studs

Follow my blog with Bloglovin
I would like to introduce you all to Nirvana!

Takko Lacquer Nirvana that is! Takko Lacquer is an insanely beautiful and sought out brand that is really difficult to get your hands on. My oh so sweet and beautiful and wonderful Naily Godmother Jeni managed to snag this for me during Takko Lacquers November restock. She didn't get anything for herself!!!! She said it had to be mine with my love of Teal.

Was it worth the effort it probably took her to digitally elbow all the other shoppers out of the way?

Absolutely!

The two coat formula was easy to use and the richness of the colour really appealed to me. You will see more of this! I didn't want to do anything to take away from this beautiful teal beauty and its swimming golden flakies! All I could bring myself to add this first time was studs that matched the flake. I loved this, nearly kissing my hands love!


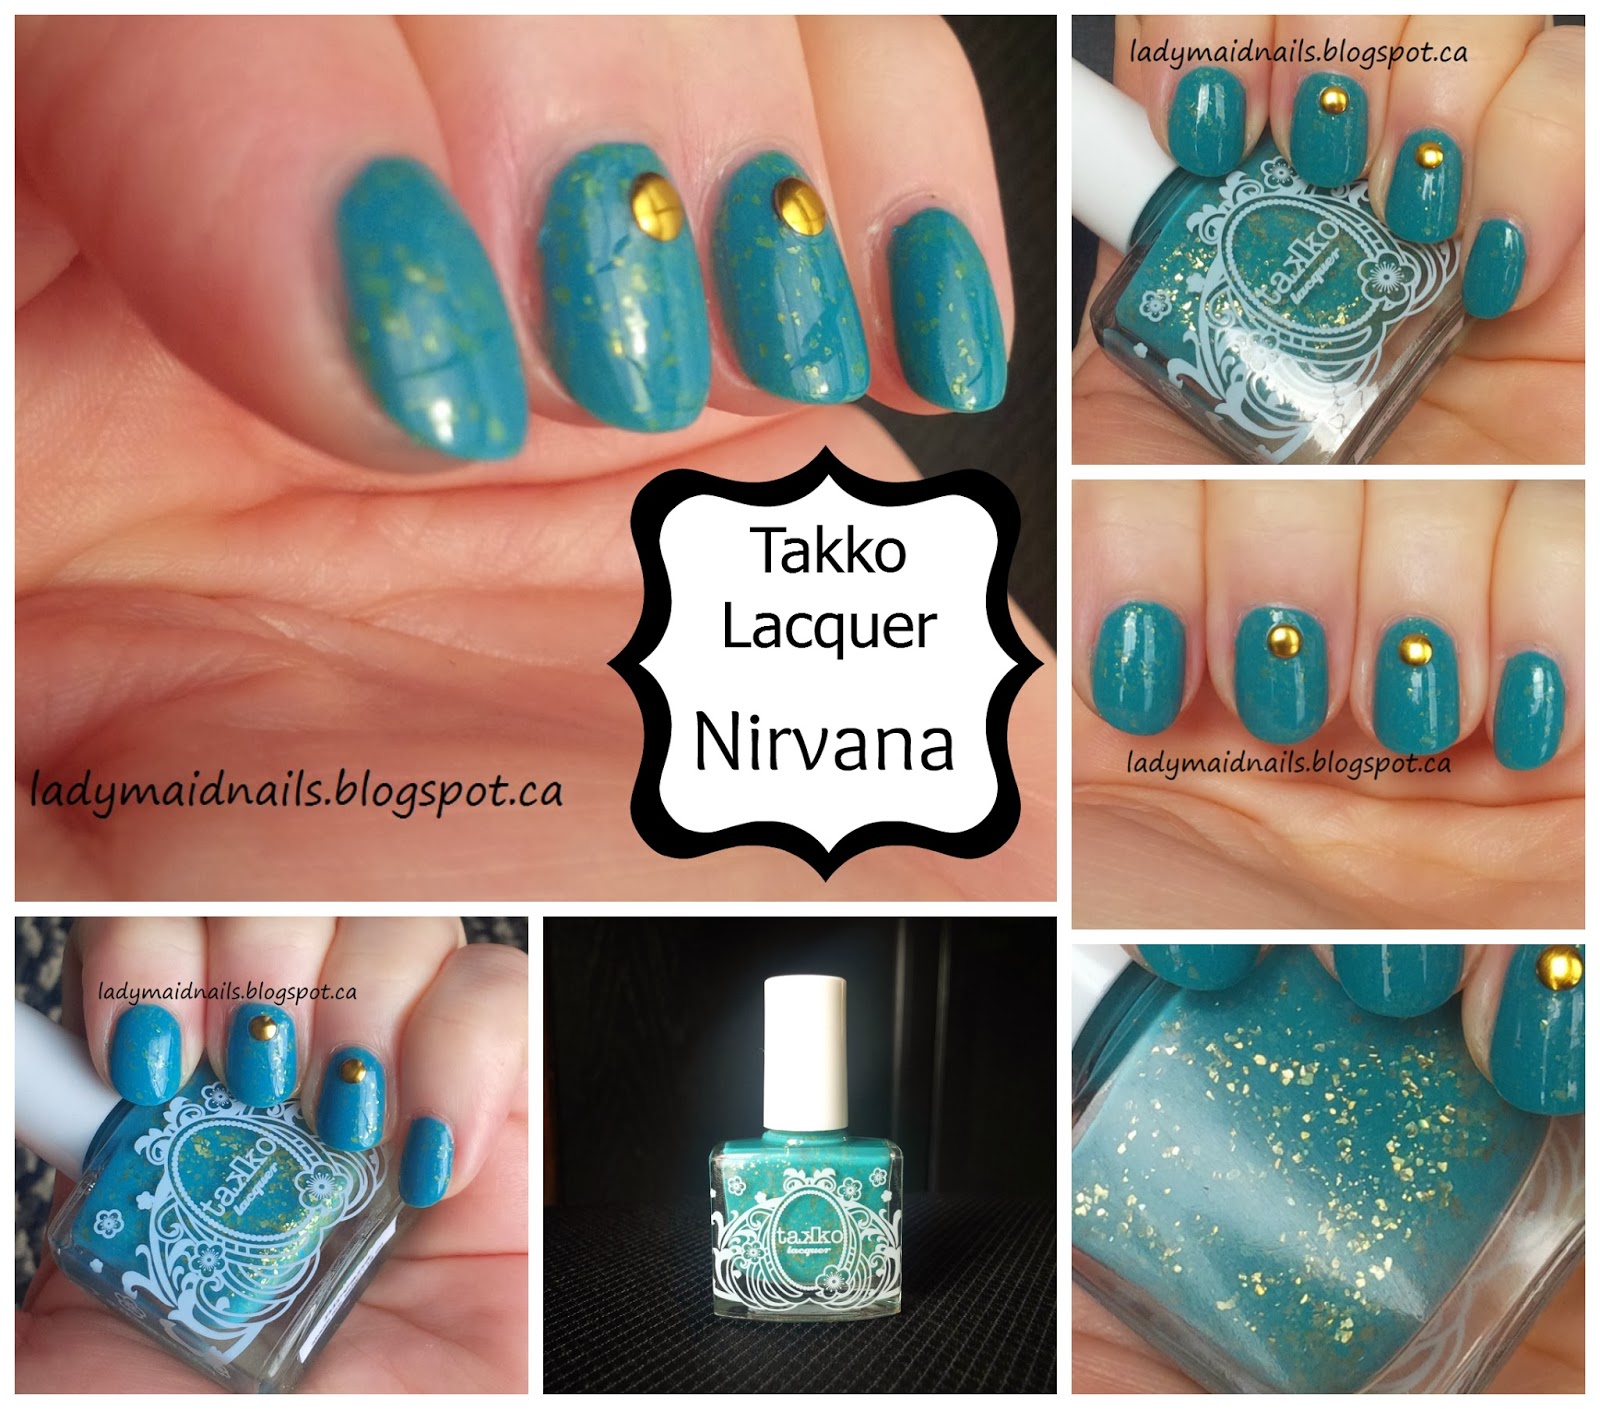
The last three are sunlight...and that bottle! Isn't her bottle design dreamy? I'm a sucker for great looking marketing and packages.

One last question.
What's better than nail mail? Nail PRESENT!
Thanks Jeni!

Cheers all,


Tuesday, February 25, 2014

Ruby White Tips, Kim and Attack of the Bat Pack!


This my dears is KIM by Ruby White Tips! And Kim is by far the best nude polish I've ever tried. This is two easy glittery and buttery smooth coats with topcoat. This polish was my first ever Ruby White Tips purchase and I fell in love.

So what's the story behind the bats your wondering? Well I am one of the admins for the Ruby White Tips Fan page on Facebook, and us crazy RWT fans call ourselves 'The Bat Pack'. We recently held a nail art contest of bat art for the members and agreed to save the posts till the contest was over and blast them out at the same time. So below you will find mine, and Here you will find my sweet friend Amie's link to her art over at her blog. Take a look, it's seriously cute!


For my bat girl I don't recall what I used to be honest. Grey, white and black polish for the bat and pink polish and a pink glitter striper for her bow. I loved this art on, and wished I had taken her wings to the nail on either side.


As always, you can find Laura's creations on her Etsy page linked here. I really and truly am a fan of this brand, which is why you guys see it so often.

Cheers all,


Monday, February 24, 2014

Guest Post from Emma


I recently  helped out a fellow blogger with a guest post while she was away prepping for the upcoming Commonwealth Games. Emma has decided to return the favor, and sent me this stunning blue manicure. You know I love blue, so I might need to recreate this one some time!

Now over to the lovely Emma.

Hi Guys! I'm Emma from emma23mereta.blogspot.co.uk, and I blog mostly about nails and my volunteering adventures.  This is the first ever guest post I have written, and I don't think I've ever been more nervous about doing a manicure AND trying to get good pictures of it. So I must apologize for the quality of my photos! 

Mandy was kind enough to do a guest post for my blog while I was away helping with preparations for the Commonwealth Games, and you can see her fantastic manicure here*. It's amazing... no pressure then!

The topic of this post is 'Favourite Colour and Favourite Technique'. My favourite colour is blue, and my favourite technique is dotting - although I seem to have lost my dotting mojo recently! Here's what I came up with:


I started off with a base of Revlon - Blue Lagoon (Light blue), and then added two coats of an un-named dark blue polish on my thumb and middle finger - it ended up a little textured, and I'm not sure if it was meant to be like that or not.  On my index finger and little finger I used two coats of a thin blue polish with glitter flakes in it, again un-named.  For the dots on my ring finger, I used the un-named dark blue polish along with CK - Electric Blue, a beautiful Mid Blue and a light blue High Brow Polish.  I used several dotting tools with two different ends creating varying sized dots.

I hope this post hasn't been too amateur for you, and if you enjoyed it just a teeny bit, you could (as Nelly once said) "come on over to my place" and check out my other posts.

Thanks for this opportunity Mandy!


OK, so Emma is adorable and so is all her work, so anytime she wants to stop by I'd be happy to have her!

Thanks to Emma again for letting me post on her blog as well. (maybe another one when she is busy during the games!)

Cheers all,


Friday, February 21, 2014

Freehand Fridays, PB & J Nail Art


PB & J you ask? Well yes! Ashley and I were stumped as to which children's character to pick this week, and I wandered around a couple Google searches and found a cutesy PB & J image. It inspired me to do something PB & J related. Why not, most kiddies are lovers of the oowie  gooey ‎goodness. (side note, spellchecker can't make up its mind on oowie...ooey...oowey)

So here we go. All the polish used are listed here, and this design was created with polish only.

‎Laquerlicious Burnt Marshmallow (base)
Finger Paints Don't make a scene
China Glaze Ingrid
Sally Hansen Berry Juicy
Sally Hansen White On
China Glaze Liquid Leather
KB Shimmer Whole Lava Lovin


Right after I got my light box photos this happened! My first broken bottle! Waaaaah! I was able to decant it luckily into an empty topcoat bottle, but its just not the same.


If anyone has a specific request for a children's book character next week, let me know below. I had hoped to do a few more before switching gears.

Cheers all,


Wednesday, February 19, 2014

Jindie Guns & Roses, Rock Chick Nails


So this was an attempt at Rock Chick style nails. I was in the mood for something Rock and Roll when my good friend lent me Jindie Nails Guns & Roses, and sometimes a girl just wants to feel a little Rock & Roll!

I started with a base of Greige Gardens on the glitter nails and then added to coats of Guns & Roses. This polish is a crazy amazing concoction of glitter. The base is a gunmetal grey with micro glitter through to medium sized glitters in various shapes and shades of pink! It's simply put gorgeous chaos, and I love this one.
My accent nail was Sally Hansen Berry Juicy with Stripes in Sinful Colors Cream Pink. Then I stamped some stars over top with BM-H25. This is the Fourth of July plate. I used China Glaze Liquid Leather. Topcoat and done. I love this look!


Here is a shot before the stamping, this was still a great look that I would wear. This one is in indirect sunlight. 
Which look do you prefer?

Cheers all,

Sunday, February 16, 2014

Laquerlicious I Now Pronounce You


So another lovely Laquerlicious Polish today, this is I Now Pronounce You. This is a crazy and beautiful concoction of glitter. Pink and purple glitter take the lead, but there is also small hexes in shades of purple and some shards in at least silver and white that I can see.

I layered this over a dark purple from Pure Ice called No Means No. This is two coats of I Now Pronounce You, and as always with Laquerlicious, it was pretty easy to get great coverage.


This one was shy for my camera a little but I gave you the best pictures I could get. These last three are in sunlight. Some polishes just do not want to be famous!

I liked this simple glitter layering combo. Although I was itching to add some art on top. 

Cheers all,

Thursday, February 13, 2014

Freehand Friday, Children's Book. Cat in the Hat


And so another Freehand Friday is here and I can't wait for you to see what I cooked up! This week I got to pick the children's book for Ashley and I. I chose Cat in the Hat. I loved all the Dr. Seuss books growing up and my lil ones love the new Cat in the Hat Show...and it's Canadian!

So here's the art. I wanted to try something new that I've seen a few girls try out. ALL acrylic nail art. I've seen a couple of the biggies do this with complicated subjects, so I thought my Friday would be a good chance to try. So no fab polish to tell you about, but look at the fab art!


I looked around online and got the face art inspiration Here at a blog called Tips and Topcoat. Her version of this was fab and worth a visit.

This art was sooo quick, due to the almost no dry time involved. Straight acrylic over base than topcoat. Worth a test for those of you contemplating acrylic paints for nail art.

Cheers all,

Mandy


Wednesday, February 12, 2014

One Last Valentine Nail Art Look, Negative Space


This is a base I created for some stamping, and then decided to try some negative space nail art instead. I'm not sure who started this idea, but it was someone very patient! It take a loooong time the way I did it and I only did that one heart in the look below.


First the base, this is Ruby White Tips Constance, (which I still owe you a swatch and review for!). I used a large number of polishes and a sponge to create this mottled and lovely base. I added China Glaze Fairy Dust for it's amazing sparkly goodness on top. I wore this for a day before I moved on to the art because it was so pretty as a look of its own.


The above picture is indirect sunlight.


So for this look, I outlined the white heart shape in acrylic and then took a brush and Q-Tip and remover and went to work scrupbbing within the outline. There must be an easier way, so I think this deserves a Google later. I do want to try again. Where I worked the polish and paint off the edges of the heart got all gummy and lumpy, and you can see how much the white paint sits off the nail. I didn't like that at all. The other three fingers I used my liner brush to add some interesting details to accompany the heart. All in all...meh...happy and romantic...but meh!


These last two have the rare Canadian winter problem of slightly too much sun, so I'm sorry for that.

I hope you enjoyed my Valentine looks. I realize now I didnt use any of my valentine stamps!!! I'll have to use them for a date night look.

Cheers all,


Monday, February 10, 2014

Ruby White Tips The Alien, Valentines Nail Art


This was a quickie on my way to a Superbowl party, so excuse my lack of normal photography! Just look at that polish though! This lovely red polish with micro gold circle holos was sent to me by Laura over at Ruby White Tips! This is called The Alien, and is now available on  Etsy as part of the American Horror story collection linked Here. Formula was great, with only a little wiggling needed. This is two coats and one of my KB quick dry, but I would suggest a second to get rid of all the texture if you don't like any bumps. I have seen the yucky creature that inspired this polish...and decided to go another way! Haha. Valentine look number three, at your service!

For the accent finger I used Costance from the same release and red acrylic for the hearts. I will be doing more with Constance very soon!


Hope you like this look. I could not stop looking at the polish! It was like sparkly strawberries on my fingers!

Cheers all,